很久沒手工裝過MySQL了,諸如AppNode這樣的服務器面板很好的幫助開發人員屏蔽了瑣碎的底層環境配置問題。不過AppNode支持的系統版本都很老了,其他面板又用不慣,於是打算手工安裝一次環境嚐鮮下新版本。
不誇張的説,我為了裝一個MySQL昨天晚上從12點折騰到凌晨3點,今天早上11點起來又折騰到13點……於是今天打算把遇到的坑總結一下,免得後人再踩進來。
坑一
Ubuntu 20.04下安裝mysql-server的過程中是不會要求輸入root密碼的,root密碼被設置成了什麼至今我也沒弄明白。
看到網上教程以及官方文檔都説安裝過程中會生成一個默認密碼,並被保存在錯誤日誌裏,然而我仔細翻過,發現並沒有。
於是乎打算強制修改root密碼,由此引出了坑二……
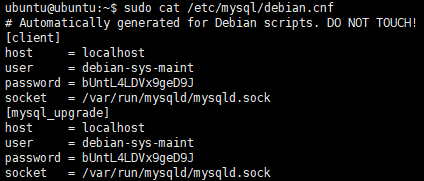
正確的查看管理密碼的方式是:
sudo cat /etc/mysql/debian.cnf
上述文件的內容是:

可以看到user字段就是管理員用户名,password當然就是默認密碼了。這個debian-sys-maint賬號是Debian系Linux下MySQL的默認管理賬號。
直接使用這個賬號登錄MySQL就可以愉快的玩耍了,如果你和我一樣不幸的按照網上的坑比文章強制重設了root密碼,請看“坑二”。
坑二
當時為了重置root密碼,在網上搜了很多文章,大部分都是教要在/etc/mysql/my.cnf中添加skip-grant-tables;選項來跳過密碼登錄。
如果你這麼做了,恭喜你,你完蛋了。
根據一篇台灣同胞寫的文章來看,這個選項會修改mysql的用户表,造成不可預知的問題。
其具體表現的症狀就是你在修改完root密碼並登陸後,執行show databases;命令會彈出如下報錯:
ERROR 1449 (HY000): The user specified as a definer ('mysql.infoschema'@'localhost') does not exist
這個報錯着實讓我頭疼了一陣,谷歌搜、百度搜、官網搜,得出的結論無非就是執行mysql_upgrade -u root -p命令,嘗試升級/var/lib/mysql下的數據庫文件。
可是,這個命令在MySQL 8.0.16中已經被廢棄了……執行後會出現如下提示:
Enter password:
The mysql_upgrade client is now deprecated. The actions executed by the upgrade client are now done by the server.
To upgrade, please start the new MySQL binary with the older data directory. Repairing user tables is done automatically. Restart is not required after upgrade.
The upgrade process automatically starts on running a new MySQL binary with an older data directory. To avoid accidental upgrades, please use the --upgrade=NONE option with the MySQL binary. The option --upgrade=FORCE is also provided to run the server upgrade sequence on demand.
It may be possible that the server upgrade fails due to a number of reasons. In that case, the upgrade sequence will run again during the next MySQL server start. If the server upgrade fails repeatedly, the server can be started with the --upgrade=MINIMAL option to start the server without executing the upgrade sequence, thus allowing users to manually rectify the problem.
當然,更可笑的是,我壓根沒執行過數據庫服務器的升級,為何要去升級數據庫文件……
要解決這個問題,就得把整個MySQL完全卸載,並刪除/var/lib/mysql目錄,重新安裝後再通過“坑一“中介紹的方式來查看管理員賬號。
如果你必須要用root用户,可以使用這個命令重置其密碼:sudo mysql_secure_installation
我也是從昨晚搞到現在,,太難了,,, 以為一切ok了,結果又卡在了1449.,。。。
現在默默卸載,,重裝,太煩了
我靠啊 真的太難了 我也弄了大半天 還好看到你的解答 趕緊刪了重裝 救星啊
我的經歷和博主幾乎一模一樣,除了發行版是Debian。。。現在卡在了“ERROR 1449 (HY000): The user specified as a definer (‘mysql.infoschema’@’localhost’) does not exist”
實在是太難了,一環套一環,網上的教程都是一模一樣的,根邊分辨不出來正確與否
很難,從來就沒想過安裝個基礎服務還能有這麼多坑
是搞IT的就該多多折騰,為什麼不嘗試其他面板呢?
問題是有比服務器面板更緊急的事情等着要去折騰……如果雨露均霑的話我怕我沒那麼多精力
我踩完坑網上搜到你這篇文章!
同是天涯淪落人……我前天剛爬出來
網上好多文章都是採集來的,一般實踐的大佬網站排名都不及採集的1/10
採集站確實是太噁心了,劣幣驅逐良幣……百度一搜一片抄襲/採集的,有用的信息太少了。