Ubuntu 20.04安裝MySQL 8.0.20記

很久沒手工裝過MySQL了,諸如AppNode這樣的伺服器面板很好的幫助開發人員遮蔽了瑣碎的底層環境配置問題。不過AppNode支援的系統版本都很老了,其他面板又用不慣,於是打算手工安裝一次環境嚐鮮下新版本。

不誇張的說,我為了裝一個MySQL昨天晚上從12點折騰到凌晨3點,今天早上11點起來又折騰到13點……於是今天打算把遇到的坑總結一下,免得後人再踩進來。

坑一

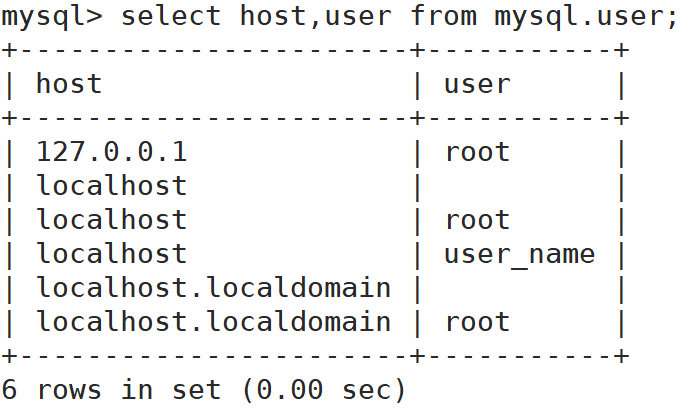
Ubuntu 20.04下安裝mysql-server的過程中是不會要求輸入root密碼的,root密碼被設定成了什麼至今我也沒弄明白。

看到網上教程以及官方文件都說安裝過程中會生成一個預設密碼,並被儲存在錯誤日誌裡,然而我仔細翻過,發現並沒有。

於是乎打算強制修改root密碼,由此引出了坑二……

正確的檢視管理密碼的方式是:

sudo cat /etc/mysql/debian.cnf

上述檔案的內容是:

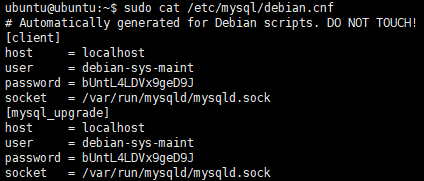
可以看到user欄位就是管理員使用者名稱,password當然就是預設密碼了。這個debian-sys-maint賬號是Debian系Linux下MySQL的預設管理賬號。

直接使用這個賬號登入MySQL就可以愉快的玩耍了,如果你和我一樣不幸的按照網上的坑比文章強制重設了root密碼,請看“坑二”。

坑二

當時為了重置root密碼,在網上搜了很多文章,大部分都是教要在/etc/mysql/my.cnf中新增skip-grant-tables;選項來跳過密碼登入。

如果你這麼做了,恭喜你,你完蛋了。

根據一篇臺灣同胞寫的文章來看,這個選項會修改mysql的使用者表,造成不可預知的問題。

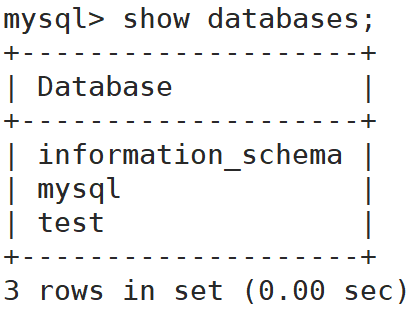
其具體表現的症狀就是你在修改完root密碼並登陸後,執行show databases;命令會彈出如下報錯:

ERROR 1449 (HY000): The user specified as a definer ('mysql.infoschema'@'localhost') does not exist

這個報錯著實讓我頭疼了一陣,谷歌搜、百度搜、官網搜,得出的結論無非就是執行mysql_upgrade -u root -p命令,嘗試升級/var/lib/mysql下的資料庫檔案。

可是,這個命令在MySQL 8.0.16中已經被廢棄了……執行後會出現如下提示:

Enter password: 
The mysql_upgrade client is now deprecated. The actions executed by the upgrade client are now done by the server.
To upgrade, please start the new MySQL binary with the older data directory. Repairing user tables is done automatically. Restart is not required after upgrade.
The upgrade process automatically starts on running a new MySQL binary with an older data directory. To avoid accidental upgrades, please use the --upgrade=NONE option with the MySQL binary. The option --upgrade=FORCE is also provided to run the server upgrade sequence on demand.
It may be possible that the server upgrade fails due to a number of reasons. In that case, the upgrade sequence will run again during the next MySQL server start. If the server upgrade fails repeatedly, the server can be started with the --upgrade=MINIMAL option to start the server without executing the upgrade sequence, thus allowing users to manually rectify the problem.

當然,更可笑的是,我壓根沒執行過資料庫伺服器的升級,為何要去升級資料庫檔案……

要解決這個問題,就得把整個MySQL完全解除安裝,並刪除/var/lib/mysql目錄,重新安裝後再透過“坑一“中介紹的方式來檢視管理員賬號。

如果你必須要用root使用者,可以使用這個命令重置其密碼:sudo mysql_secure_installation

MySQL基本命令介紹

關於本篇文章:
本文中只包含最常用的MySQL命令,也是應該全部掌握的MySQL命令,我將以一個簡單的案例來對這些命令做簡要說明。
MySQL介紹:
MySQL是優秀的開源關係型資料庫,最初由瑞典MySQL AB 公司開發,目前屬於Oracle旗下產品。
基本資料庫管理命令介紹:
注:以下內容中的“mysql>”為MySQL客戶端的命令提示符標誌。另外,MySQL命令建議使用大寫字母來書寫,因為我個人習慣的問題,本篇文章中採用小寫。
建立一個名為db_name的資料庫。

mysql>create database db_name;

檢視當前已存在的資料庫。

mysql>show databases;

MySQL返回資訊:

建立一個新使用者,user_name,密碼為ibadboy.net。

mysql>create user user_name@localhost identified by "ibadboy.net";

設定使用者許可權,使其對db_name資料庫擁有全部許可權。

mysql>grant all privileges on db_name.* to user_name@localhost identified by "ibadboy.net";

檢視剛剛新增的使用者。

mysql>select host,user from mysql.user;


檢視user_name使用者所擁有的許可權。

mysql>show grants for user_name@localhost;


使用新新增的user_name使用者重新登入資料庫 。

[root@localhost ~]# mysql -u user_name -p

選擇db_name資料庫,其後的建表查表以及插入資料等操作都會在此資料庫下進行。

mysql>use db_name;

建立一個名為user的表,其擁有三個欄位,分別是ID(int型)、name(char型)、password(char型),其中ID是主鍵且可自增。

mysql>create table user(ID int auto_increment primary key,name char(10),password char(64));

檢視資料庫中已有的表。

mysql>show tables;

MySQL返回資訊:

檢視user表的結構。

mysql>desc user;

MySQL返回資訊:

向user表中插入兩行資料。

mysql>insert into user values(0,'myuser1','123456'); 
mysql>insert into user values(1,'myuser2','654321');

檢視user表中所有欄位的資料。

mysql>select * from user;

MySQL返回資訊:

只檢視user表中的name欄位的資料。

mysql>select name from user;

MySQL返回資訊:

更新user表中的name欄位中的“myuser1”為“admin”,where關鍵字後面是替換條件。

mysql>update user set name='admin' where name='myuser1';

再次檢視user表中的name欄位發現“myuser1”已變為“admin”。

向user表中插入欄位sex(varchar型)。

mysql>alter table user add sex varchar(6);

檢視user表的表結構,可以發現,sex欄位已加入其中。

檢視user表中的資料。

此時,在之前插入的兩行資料中,sex欄位的值都是NULL(空值),現在我分別在其中插入“male”和“female”兩個值。這裡以主鍵“ID”來作為替換條件,以此達到只修改sex欄位在某一行的值的效果。

mysql>update user set sex='male' where ID=0;
mysql>update user set sex='female' where ID=1;

查詢user表中sex欄位的值,已經變成了預想的樣子。

在user表的“password”欄位的後面插入一個欄位“age”,型別為int。其中,after關鍵字後面指定的是新加欄位要跟隨的欄位。

mysql>alter table user add age int after password;

檢視user表的表結構,age欄位已新增至指定位置。

基本的資料庫操作就這些,下面我將一步步的刪除掉我們剛剛新增的欄位、表及資料庫。
先刪除“age”欄位。

mysql>alter table user drop column age;

檢視錶結構,欄位已刪除。

刪除user這個資料表。

mysql>drop table user;

檢視資料庫中已有的表,因資料庫已空,所以這裡沒有列出任何內容。

刪除db_name資料庫。

mysql>drop database db_name;

檢視當前已存在的資料庫,發現此時db_name已被刪除。

切換到MySQL的root使用者身份上,刪除user_name使用者。

mysql>drop user user_name@localhost